You are here: 1. Distribution System > 1.5. INVENTORY Menu: Purchasing and Stock Control > 1.5.10. Inventory - Import Costing > Entering Import Cost Lines

Entering Import Cost Lines

You use the Enter Import Cost Line screen to add and maintain the items you want to include in an import costing batch or quote. If you have loaded a purchase order into the import costing batch, you can add, edit or delete the purchase order lines. If you are manually creating the import costing batch because there is no purchase order in Micronet, you can add the lines you are receiving.


Technical Tip

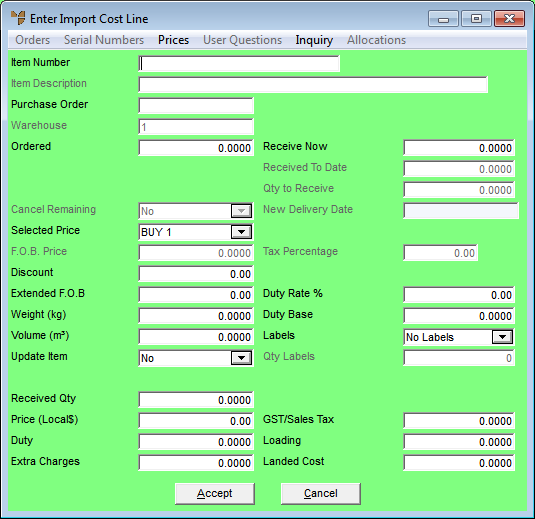
If an import cost batch has already been partially released, the only field on this screen that you can edit is the Receive Now field. See below for more detail.

Also note that items cannot be added to or deleted from a batch once the import cost batch has been partially released.

To access and maintain the items associated with an import costing batch or quote:

  1. Create a new import costing batch, or load an existing one.

Refer to "Creating a New Import Costing Batch" or "Recalling an Import Costing Batch".

Micronet displays the Import Costing screen.

  1. For costed shipments, if there is more than one invoice associated with the shipment, select (or create) the supplier invoice you want to work on.

Refer to "Import Costing - Change Invoice".

Micronet displays the item lines associated with the selected invoice.

  1. If you want to:

If you selected to add or edit items, Micronet displays the Enter Import Cost Line screen.

  1. Complete the following fields:


Field

Value


Item Number

Enter the ID of the item being received. You can also press Tab or Enter to select an item.


Item Description

Micronet displays the description of the selected item.


Technical Tip

If you add an item to an import costing batch for a supplier that is not the preferred supplier for that item, and your user security does not allow you to do this, Micronet displays a message that you have insufficient user security to change the supplier. Select OK to display a screen where an authorised user (e.g. a supervisor) can enter their userID and password, allowing you to add the item to the import costing batch.

This security feature is set in the Allow P/O creation where presupplier does not match field on the User File Update screen - MDS Security tab (refer to "Maintenance - Edit UserIDs - 4. MDS Security").


Purchase Order

If you are receiving an order that has been previously entered into Micronet, enter the purchase order number for this shipment. You can press spacebar then Enter to select from a list of purchase orders on file for this item, or you can select the ORDERS menu option.


Warehouse

Micronet displays your default warehouse. If this field is enabled, you can select the warehouse to post this receipt of stock to.


Reference

If your company is configured for multiple bin locations and your userID allows you to edit bin locations, Micronet displays the Bin Locations and Quantities screen. Refer to "Enter Import Cost Line - Selecting Bins and Quantities" for more information.

If Micronet has been setup to use the Main Bin Only or Priority Order and you do not have authority to edit bin locations, the selection of bins will be automatic and performed in the background.

If the ENTER DEFAULT RECEIPT BIN LOCATION option is turned on on the Import Costing screen, you only need to enter bin locations on lines that will be placed into a different bin to the default bin entered when you post the batch. See "Import Costing - Edit - Enter Default Receipt Bin Location" for more information.


Ordered

Micronet displays the quantity ordered based on the Purchase Order field.


Receive Now

Enter the number of items actually received.

If Micronet has been setup to allow the partial release of goods via import costing, and you have received only a partial order, enter the quantity being received now – that is, the quantity to be released into stock.


Technical Tip

You can only partially release goods during import costing if the Allow Partial Releases on Import Cost field on the Import Costing Setup screen is set to Yes (refer to "Edit Company - Edit - Import Costing" for more information).


Technical Tip

2.8 Feature

If you are receiving an item that has been setup with unit recognition, Micronet automatically displays the Unit Recognition screen so you can enter the quantity received in the appropriate units (e.g. square metres, boxes, pallets, etc.). Select the Add button to display the Edit Units screen, enter the quantity of the item received in the appropriate units then select Accept.


Received to Date

If you have received only a partial order, enter the quantity of the order that has been received to date – that is, the quantity that has already been released into stock.


Qty to Receive

If you have received only a partial order, enter the total quantity to be released into stock from the import cost batch. The amounts in the Receive Now and Received To Date fields cannot be greater than this amount.


Cancel Remaining

If you have received only a partial order, select Yes to cancel the portion of the order that has not been received, or No if you are still expecting to receive the remainder of the order.


New Delivery Date

If you are still expecting to receive the remainder of the order, enter the date by which you expect to receive it.


Selected Price

Select the cost price charged for the items on the supplier invoice. If you want to enter a price manually or change the price displayed, select Nett and enter the actual price in the FOB Price field.


Technical Tip

Micronet can be configured so that it automatically updates the buy prices on items in the Inventory master file with the cost price selected in this field. This is done by selecting an option other than No in the Copy Cost Price to Buy 1-8 fields on the Purchasing Configuration screen – see "Edit - Program - Purchasing".

The buy prices that are updated depend on the price selected in the Selected Price field:

  • Buy Price 1-8 – only that specific buy price will be updated
  • Purchase Order Price – the buy price will be updated with the price from the purchase order
  • Nett – Micronet will check the Default Buy Price on the supplier and only update that price
  • Last Cost or Average Cost – none of the buy prices on the item will be updated.


FOB Price

If you selected Nett in the previous field, enter the overseas buy price for the goods.


Tax Percentage

Micronet displays the default GST/sales tax percentage for the item as setup in the Inventory master file


Discount

Enter any discount you have received from the supplier on the price of the item, as a percentage.


Extended FOB


Duty Rate %

If duty tables are setup in your company configuration, Micronet displays the duty rate for the item entered in the Inventory master file (refer to "File - Inventory - Purchasing").

This field must display a value if you have entered Duty (inc GST) in the Enter Duty Charges screen via the Import Costing Header. Enter the duty percentage rate to calculate the charge applicable to the item if required.

You can leave this field blank if you have included Duty (inc GST) in the Import Costing Charges screen via the Import Costing Header.


Duty Base

Micronet displays the price on which duty is calculated. You can change this if required.


Weight

Micronet displays the item weight set up in the Inventory master file. You can change this weight if required.


Volume

Micronet displays the item volume set up in the Inventory master file. You can change this volume if required.


Update Item

Select Yes if you have changed the weight or volume of the item and you want the Inventory master file updated with this change. Otherwise select No.


Labels

Select whether you want labels printed for this shipment. Options are:

  • No Labels
  • One Label
  • Qty Received
  • Stock on Hand
  • Ask Quantity.

When you select any option other than No Labels, Micronet creates a batch with the items and label quantities specified when the import costing batch is posted. To recall this batch for viewing, altering, printing or deleting, refer to "Inventory Reports - Batch Label Report".


Technical Tip

The default option displayed in this field depends on the setting in the Default Labels field on the Purchasing Configuration screen (refer to "Edit - Program - Purchasing").


Qty Labels

If you selected Ask Quantity in the Labels field, enter the number of labels you want printed.


Received Qty


Price (Local$)

Micronet displays the item cost in $AUS.


Duty

Micronet displays any duty amount added to the item cost, calculated by applying the Duty Rate to the Duty Base.


Extra Charges

Micronet displays any additional charges added to the item cost on the Import Costing Charges screen (refer to "Import Costing Header - Import Costing Charges"), and appropriated as specified in the Appropriation field on the Import Costing Header (refer to "Maintaining the Import Costing Header").


GST/Sales Tax

Micronet displays any sales tax for this item.


Loading

Micronet displays any loading added to the item cost. The loading percentage is entered in the Loading Rate field on the Import Costing Header screen (refer to "Maintaining the Import Costing Header").

For example, if the new landed cost was $12.00 and you had a loading of 10%, then Micronet would receipt the item at a total cost price of $12.00 + 10% = $13.20.


Landed Cost

Micronet displays the total landed cost of the item, including all on-costs and charges such as duty and freight, appropriated by weight/volume/price.

  1. Optionally, you can perform any of the following edits or actions on the Enter Import Cost Line screen if required:
  1. When you have finished maintaining the details for the import cost line, select the Accept button.

Micronet saves the details of the item you have added or edited and redisplays the Enter Import Cost Line screen so you can continue adding or maintaining import costing lines.


Technical Tip

2.8 Feature

If Micronet displays a message that you cannot allocate more units than you have received, it means that the quantity allocated to backorders, etc., is greater than the quantity received. You need to fix the over-allocation before you can proceed – refer to "Enter Import Cost Line - Allocations (v2.8)".

  1. When you have finished adding and maintaining import cost lines, select the Cancel button to close the Enter Import Cost Line screen.

Micronet redisplays the Import Costing screen showing all the items included in the import costing batch. If the item lines loaded from a purchase order match with the supplier invoice lines, the Invoice Details and the Receipt Detailsfields should be the same.